
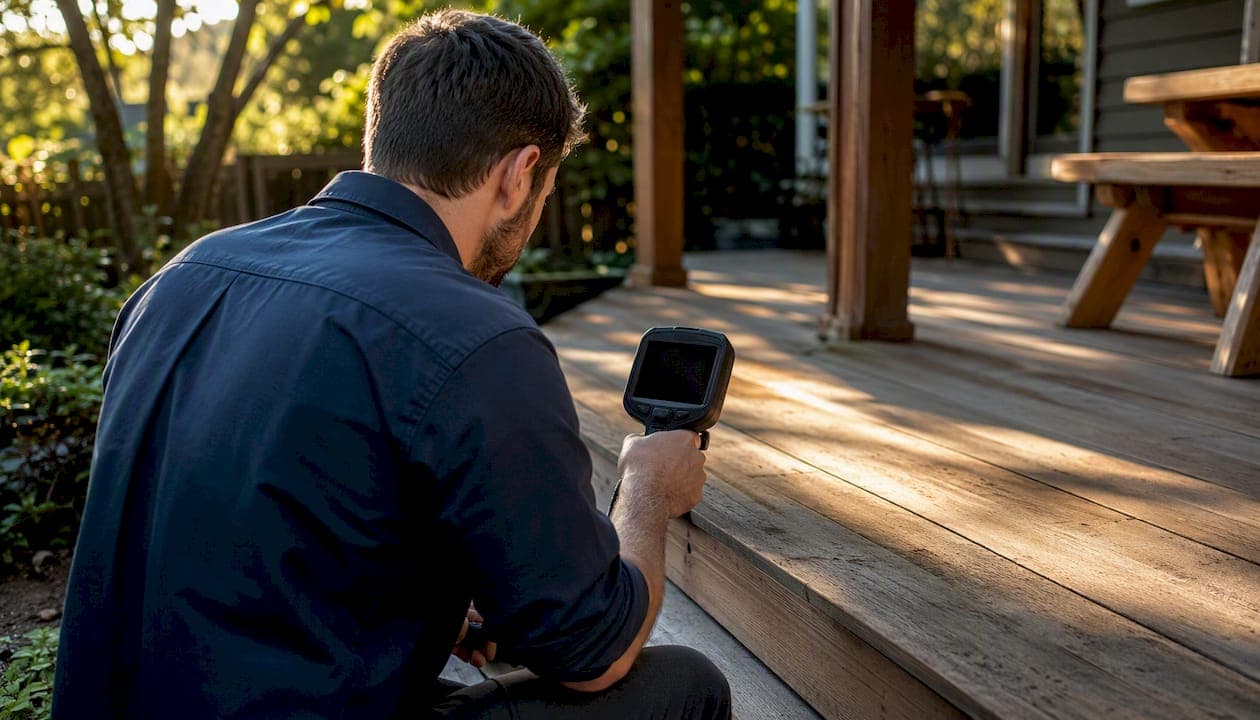
Thermal imaging works for termite detection, but it is not a magic window into your walls. A thermal camera picks up surface temperature differences caused by moisture-heavy mud tubes, large active colonies, and structural voids — and those differences are often enough to flag a problem. The catch: it cannot identify species, see through solid material, or catch a small early-stage infestation reliably. The right move is to run a focused scan during a stable-temperature window, then verify any anomaly with a moisture meter or borescope. If signs persist after that, call a licensed inspector. FLIR's guidance on pest detection makes this hierarchy clear: thermal imaging is a screening tool, not a standalone diagnosis.
Key Takeaways
Thermal imaging is a reliable screening tool for termite activity when used correctly, but it requires moisture meter corroboration and professional follow-up to produce a defensible finding.
| Point | Details |
|---|---|
| Thermal imaging is indirect | Cameras detect surface temperature anomalies from moisture, heat, or voids — not termites themselves. |
| Large colonies, best results | In a timber-sample trial, thermal imaging and moisture meters achieved 100% detection for large colonies under controlled conditions; performance for small or early infestations is lower across all methods. |
| Camera specs matter | A radiometric camera with NETD below 50 mK and 320×240 resolution or higher is needed for moisture-level detection. |
| Scan in stable conditions | Early morning or post-sunset scans with a delta-T of at least 10°F produce the most interpretable thermographs. |
| Bespoke-enviro integrates methods | Professional inspections combine thermal, moisture, acoustic, and physical verification for confirmed findings. |
Table of Contents
- How thermal imaging detects indirect signs of termite activity
- How reliable is thermal imaging for finding termites?
- Which camera features actually matter for termite inspections?
- How to scan your home for termites with a thermal camera
- When should you call a professional termite inspector?
- Common thermal false positives and how to rule them out
- Other non-invasive tools professionals use alongside thermal cameras
- How to read a thermograph: what termite activity actually looks like
- What recent research says about termite detection technology
- Keeping your thermal camera accurate for termite inspections
- Why a single thermograph is never enough
- Bespoke-enviro brings professional-grade termite inspections to your property
- Sources
How thermal imaging detects indirect signs of termite activity
A thermal camera does not see termites. It reads surface temperature, and termites leave thermal footprints by changing what happens just beneath that surface.
The physics are straightforward. Every material emits infrared radiation proportional to its temperature. A thermal camera captures that radiation and maps it as a color gradient. When termites build moisture-laden mud tubes inside a wall cavity, that moisture cools the surface slightly. A large, active colony generates metabolic heat that can warm a localized patch. A void left by structural damage changes how heat moves through the material, creating a thermal bridge or break that shows up as an irregular patch.
For a homeowner running a scan, four physical concepts determine whether you get a useful image:
- Emissivity: Different materials emit infrared at different efficiencies. Wood and drywall have high emissivity (around 0.90–0.95), making them easier to read accurately. Glass and metal are low-emissivity and reflect ambient heat, which causes false readings.
- Temperature gradient (delta-T): The bigger the difference between indoor and outdoor temperature, the sharper the anomalies appear. A delta-T of at least 10°F is the practical minimum for useful results.
- Thermal inertia: Dense materials like masonry hold heat longer; wood and drywall respond faster. A void or moisture pocket disrupts that pattern.
- Thermal bridging: Structural members, fasteners, or wet framing conduct heat differently than surrounding material, creating visible lines or patches.
None of this is X-ray vision. What you are doing is reading the surface consequence of what is happening inside.
How reliable is thermal imaging for finding termites?
Reliability depends heavily on colony size, species, building construction, and environmental conditions. Thermal imaging and moisture meters are strong performers against large, active colonies. They struggle with small or dry infestations, and with species that build minimal moisture infrastructure.
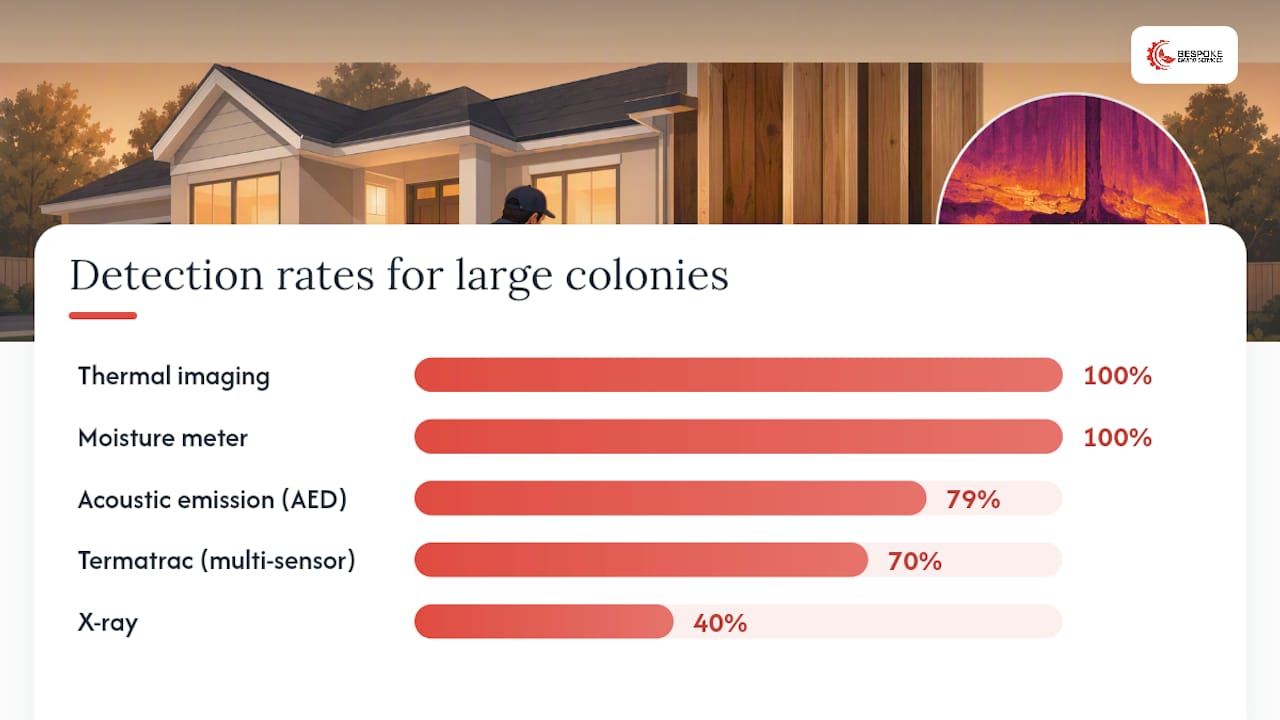
A timber-sample trial published in the Scandinavian Journal of Forest Research quantified this directly. Thermal imaging and moisture meters both achieved 100% detection for large colonies under those trial conditions, while acoustic emission detection (AED) reached 79%, Termatrac reached 70%, X-ray reached 40%, and visual inspection reached 35%. Those figures apply to large colonies in controlled sample conditions — real-world performance on small or early infestations is lower across all methods.
| Detection Method | Detection Rate (Large Colonies, Trial Conditions) |
|---|---|
| Thermal imaging | 100% |
| Moisture meter | 100% |
| Acoustic emission detection (AED) | 79% |
| Termatrac (multi-sensor) | 70% |
| X-ray | 40% |
| Visual inspection | 35% |
Key finding: Thermal imaging and moisture meters matched each other at the top of the detection table in this trial — but both methods were tested on large, established colonies. Neither is reliable for early-stage or cryptic infestations without corroboration.
Common false positives that mimic termite signatures include direct sunlight warming an exterior wall, hot water pipes running behind drywall, electrical panels and wiring, HVAC ducts and leaks, and gaps in insulation. Each of these creates a surface temperature anomaly that looks similar to moisture or colony heat. The ScienceDirect review on termite detection is direct on this point: single-method thermal inspection alone often misses cryptic infestations and generates false positives that require corroboration to resolve.
Which camera features actually matter for termite inspections?
The spec that matters most is thermal sensitivity, measured as NETD (Noise Equivalent Temperature Difference). A lower NETD means the camera detects smaller temperature differences. For termite work, where moisture gradients can be as small as 1–2°F, sensitivity below 50 mK is worth paying for. Resolution (detector pixel count) determines how much spatial detail you get — a 160×120 detector is enough to spot a large nest, but a 320×240 or higher detector resolves the subtle moisture gradients that indicate early activity.
Radiometric capability means the camera stores actual temperature data in every pixel, not just a color image. That matters for documentation: a radiometric image lets an inspector or report reader verify the temperature values later, rather than relying on a screenshot.
Key specs to check before renting or buying:
- NETD: Below 50 mK for termite work; below 40 mK for professional-grade moisture mapping
- Detector resolution: 160×120 minimum; 320×240 or higher for reliable moisture detection
- Radiometric output: Required for inspection reports and professional handoff
- Lens FOV and close-focus: A wide FOV (45°+) covers walls faster; close-focus capability (under 12 inches) helps for baseboards and tight spaces
- MSX or image enhancement: Blends visible-light detail onto the thermal image, making anomalies easier to locate on the actual wall
- App and reporting: Useful for field annotation and PDF report generation
The table below covers three practical tiers. Higher-resolution radiometric cameras improve the chance of detecting moisture-related termite signatures and produce documentation that holds up in inspection reports.
For most homeowners, renting a mid-tier radiometric unit from a tool rental shop or online platform costs $50–$150 per day and is more practical than buying. If you are a property manager running quarterly checks on multiple buildings, a mid-tier purchase starts to pay for itself.
How to scan your home for termites with a thermal camera
Preparation determines whether your scan produces useful data or a collection of confusing blobs.
- Condition the building. Close all windows, doors, and HVAC vents at least one hour before scanning. You need a stable indoor-outdoor temperature differential of at least 10°F. Early morning (before sunrise) and the two hours after sunset are the best windows — solar heating has faded and the building envelope is still warm or cool from the day.
- Note recent weather. Post-rain conditions increase moisture contrast in wood framing, making termite mud tubes and wet galleries more visible. Dry, windy days reduce contrast.
- Set emissivity correctly. For wood and drywall, set emissivity to 0.90–0.95 on a radiometric camera. Skipping this step produces temperature readings that are off by several degrees.
- Scan systematically. Workroom by room: exterior-facing walls first, then baseboards, window frames, door frames, attic access points, crawlspace entry, and any wood-framed porches or decks. Hold the camera 3–6 feet from the wall surface for standard walls; move closer (12–18 inches) for baseboards and trim.
- Flag anomalies immediately. When you see a cool linear band, a localized warm patch, or an irregular moisture pattern, capture a radiometric image, note the room and wall orientation, and mark the location on a simple floor-plan sketch or photo.
- Take a moisture meter reading on every flagged spot. A Tramex or similar pin-type moisture meter on the surface or a small probe hole confirms whether elevated moisture is present. If the meter reads high where the thermal camera flagged an anomaly, the probability of a real issue rises significantly.
- Use a borescope for confirmation. A $30–$80 USB borescope inserted through a small drill hole lets you visually confirm mud tubes, frass, or gallery damage before calling in a pro.
Operator skill and environmental conditioning are critical to producing interpretable thermographs — the camera settings matter as much as the camera itself.
Pro Tip: Before scanning, tape a piece of black electrical tape (emissivity ~0.95) onto any shiny metal surface in the room — pipes, brackets, HVAC registers. Point the camera at the tape rather than the metal to get an accurate ambient temperature reference and avoid reflection artifacts skewing your readings.
When should you call a professional termite inspector?
DIY thermal scanning is a useful first filter, not a final answer. Call a licensed inspector when:
- A moisture meter confirms elevated readings at a thermally flagged spot in a structural member (floor joist, wall stud, beam)
- You find visible mud tubes, frass, or damaged wood near a thermal anomaly
- The property has a prior termite history or is in a high-risk zone
- You are buying or selling the property (a transaction inspection requires a licensed report)
- Thermographs are ambiguous after DIY verification and you cannot access the space (sealed crawlspace, finished attic)
A professional inspection adds several things a homeowner scan cannot. Certified thermographers use calibrated radiometric cameras and know how to read ambiguous patterns that look similar to insulation gaps or plumbing. They carry Tramex moisture meters, acoustic detectors, and Termatrac-style multi-sensor devices that combine microwave, temperature, and moisture readings in a single pass. A borescope confirms what the camera suggests. For large exterior surveys, some inspectors now use drone-mounted thermal cameras to scan rooflines and embankments without scaffolding.
When reviewing a proposal or report, ask for radiometric images (not just color screenshots), moisture readings correlated to thermal anomalies, evidence of physical verification (probing or borescope), and the inspector's license number and insurance. A report that shows only thermal images with no corroborating data is incomplete. USDA Forest Products Laboratory evaluations consistently recommend pairing thermal readings with moisture and acoustic sensing for reliable remote monitoring of wooden structures.
Common thermal false positives and how to rule them out
Most anomalies a homeowner finds on a first scan are not termites. Working through a short diagnostic sequence before calling a pro saves time and money.
Common false positives and their diagnostic cues:
- Sunlight or solar heating: A warm patch on an exterior wall that faces south or west. Check: rescan the same wall after dark. If the anomaly disappears, it was solar gain, not a biological heat source.
- Hot water pipes: A warm linear band running vertically or horizontally, often consistent with bathroom or kitchen plumbing routes. Check: trace the pipe path on a floor plan. If the thermal line follows the pipe exactly, it is plumbing.
- Electrical panels and wiring: Localized warm spots near outlets, switches, or panel boxes. Check: match the anomaly location to the electrical plan. Warm outlets can also indicate overloaded circuits — worth flagging regardless.
- HVAC ducts or leaks: Warm or cool bands near ceiling registers or duct runs. Check: turn off the HVAC and rescan after 30 minutes. Anomaly that fades is HVAC-related.
- Insulation gaps: Cool patches on exterior walls, especially in older homes. Check: probe with a moisture meter. Low moisture reading plus a cool patch typically means missing or settled insulation, not termites.
To rule out a false positive systematically:
- Rescan at a different time of day (especially after dark for solar-related anomalies).
- Take a moisture meter reading at the flagged spot. High moisture with a thermal anomaly is a stronger signal.
- Insert a borescope through a small probe hole to visually inspect the cavity.
- If the anomaly persists across two scans and the moisture meter reads elevated, treat it as a real finding and escalate.
An anomaly that survives all three checks — different time, elevated moisture, and visual confirmation — warrants professional follow-up even if a plausible alternate explanation exists.
Other non-invasive tools professionals use alongside thermal cameras
Thermal imaging covers a lot of ground quickly, but it works best as the first pass in a multi-tool workflow. Here is what professionals reach for next:
- Moisture meters (Tramex, Delmhorst): Fast and inexpensive. Pin-type meters penetrate the surface slightly; non-contact meters read through paint and drywall. Either type confirms whether a thermal anomaly corresponds to actual wet framing. Homeowners can rent or buy a basic pin meter for under $50.
- Acoustic emission detectors (AED): Detect the feeding and movement sounds termites produce inside wood. Useful for localized confirmation once a thermal scan has flagged a zone. Sensitive to ambient noise, so they work better in quiet conditions. Typically a pro tool due to cost and interpretation skill required.
- Termatrac T3i: A multi-sensor device combining microwave motion detection, temperature sensing, and moisture measurement in one unit. The microwave component detects termite movement through walls without contact. Detection rates in the timber trial were moderate for large colonies — useful as a corroborating tool rather than a primary screen.
- Borescopes: A $30–$80 USB borescope inserted through a 3/8-inch drill hole gives direct visual confirmation. The most definitive non-destructive verification step available to a homeowner.
- Drone thermal surveys: For large properties, rooflines, or embankment inspections, drone-mounted thermal cameras cover exterior surfaces faster than a ladder-and-camera approach. Studies report detection accuracy for drone-based thermal surveys of termite mounds in exterior conditions — a promising result for property managers with large grounds.
The USDA recommendation to combine thermal, moisture, and acoustic sensing reflects the practical reality: each tool has a blind spot the others cover.
How to read a thermograph: what termite activity actually looks like
Knowing what to look for prevents you from chasing every color variation on the screen.
Typical thermal signatures associated with termite activity:
- Linear cool bands: A slightly cooler horizontal or diagonal line along a baseboard or wall section, often 2–6 inches wide. This pattern suggests moisture from a mud tube or wet gallery running inside the wall cavity. Cool because moisture evaporates and lowers surface temperature.
- Localized warm pockets: A diffuse warm patch, often 6–18 inches across, under a subfloor or in a wall cavity. Large, active colonies generate metabolic heat. This signature is more common with subterranean species in warm climates.
- Irregular cool spots: Scattered cool patches that do not follow pipe or duct lines. These can indicate moisture infiltration from damaged wood or compromised framing.
When you capture an image to send to an inspector, include this information in the caption or accompanying note:
- Camera model and tier (e.g., "FLIR E8-XT, radiometric")
- Emissivity setting used
- Indoor and outdoor temperature at time of scan (delta-T)
- Location on property (e.g., "north exterior wall, master bedroom, 18 inches above baseboard")
- Moisture meter reading at the same spot (e.g., "Tramex non-contact: 22% — elevated")
Pro Tip: Save radiometric images in the camera's native format (.fff for FLIR, .irg for InfiRay), not just as JPEGs. The native file preserves per-pixel temperature data, which an inspector can re-analyze with different color palettes or temperature ranges to extract detail you may have missed in the field.
What recent research says about termite detection technology
The research direction is clear: no single tool is sufficient, and the gap between single-method and multi-method detection is large enough to matter in practice.
Recent advances worth knowing about:
- AI and deep-learning models are being trained to analyze fused acoustic and thermal signals, reducing the operator skill required to interpret ambiguous patterns. A 2025 Sensors article documents successful applications of these models for automated termite detection.
- Drone-mounted thermal cameras have moved from research to field use for large exterior surveys, with studies reporting around 81% accuracy for mound detection.
- Multi-sensor fusion (thermal + microwave + acoustic + moisture) is the direction the field is moving. The ScienceDirect review identifies this as the current best practice for building inspections.
For homeowners and property managers, the practical implication is that affordable multi-sensor rental kits and AI-assisted interpretation apps are likely to become more accessible over the next few years. For now, the best available approach remains a combined-method inspection: thermal screening first, moisture and acoustic corroboration second, and physical verification third.
Keeping your thermal camera accurate for termite inspections
A thermal camera that drifts out of calibration produces false readings that are worse than no reading at all — you end up chasing anomalies that do not exist.
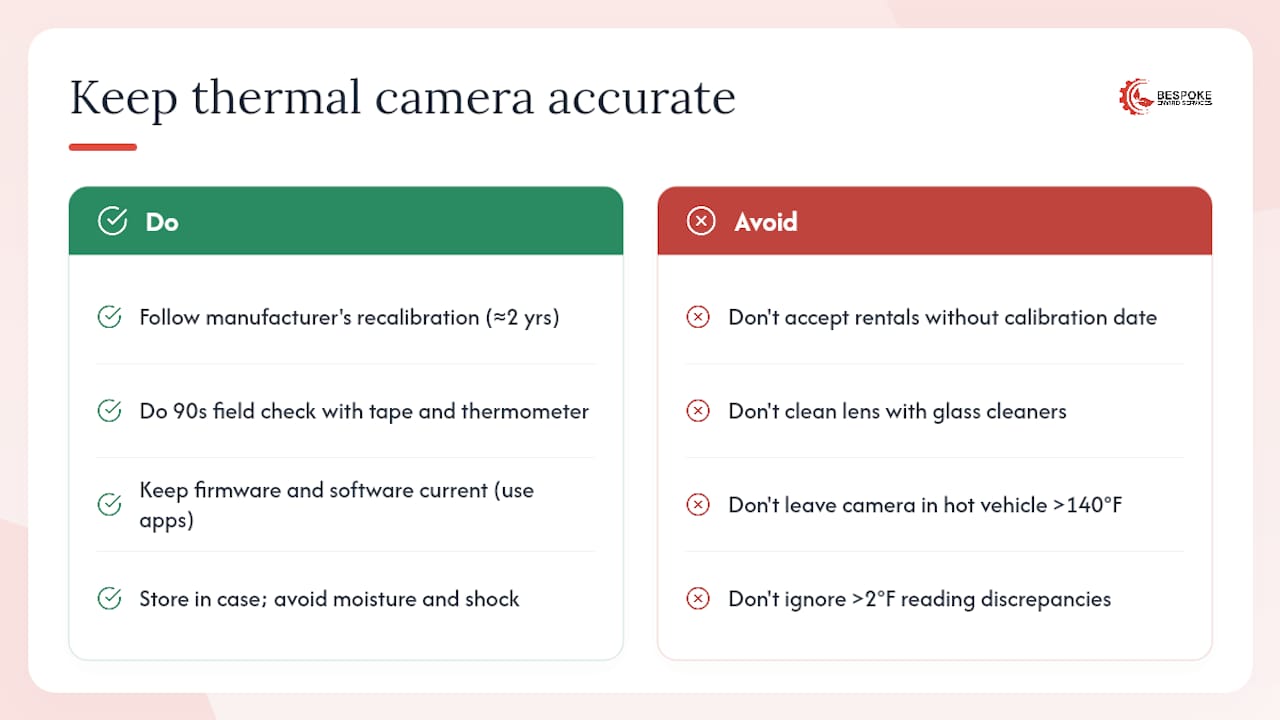
Factory calibration and recalibration. Most professional-grade thermal cameras (FLIR Exx series, InfiRay T series) are factory-calibrated and specify a recalibration interval, typically every two years for professional use. If you own a camera, follow the manufacturer's schedule. Rental units from reputable suppliers are generally calibrated on a regular service cycle — ask for the last calibration date before accepting the unit.
Field checks before each scan. Point the camera at a surface with known emissivity (a piece of black electrical tape works well) and compare the reading to a contact thermometer. If the values differ by more than 2°F, the camera needs service or the emissivity setting needs adjustment. This takes 90 seconds and catches most field errors before they corrupt a scan.
Lens care. The germanium lens on a thermal camera scratches easily and does not tolerate standard glass cleaners. Use only a dry microfiber cloth or the manufacturer's recommended lens tissue. A scratched lens reduces image sharpness and can introduce artifacts that look like thermal anomalies.
Storage and transport. Keep the camera in its case when not in use. Thermal detectors are sensitive to moisture and physical shock. Avoid leaving the camera in a hot vehicle — prolonged exposure above 140°F can damage the detector array.
Software and firmware. Keep the camera's firmware current. Manufacturers periodically release updates that improve temperature accuracy and fix known measurement errors. For FLIR cameras, FLIR Tools and FLIR Thermal Studio handle firmware updates and radiometric image analysis. InfiRay and Hikmicro have their own companion apps with similar update functions.
Why a single thermograph is never enough
The most common mistake homeowners make with thermal imaging is treating a single anomalous image as confirmation of termites. It is not. A thermograph is a hypothesis, not a diagnosis.
The evidence for multi-method verification is consistent across every major review. The timber-sample trial showed thermal imaging at 100% for large colonies — but that is the best-case scenario, not the average. Real buildings have insulation gaps, plumbing runs, and HVAC artifacts that produce identical signatures. The FLIR guidance on pest detection is explicit: operator training and environmental conditioning are prerequisites for interpretable results, and even trained operators use corroborating tools.
What I find underappreciated is the asymmetry of the risk. A false negative (missing a real infestation) costs you structural damage. A false positive (treating a plumbing leak as termites) costs you an unnecessary treatment. Both errors are expensive, and both are more likely when you rely on a single tool. The moisture meter is the cheapest insurance against both: it takes 30 seconds, costs under $50 to rent, and immediately separates most thermal anomalies into "worth investigating further" and "probably not termites."
Bespoke-enviro's approach to termite inspections reflects this: thermal screening is the starting point, not the conclusion. Thirty years of integrated pest management work in Singapore has reinforced that multi-sensor corroboration is what separates a reliable inspection from an expensive guess.
Bespoke-enviro brings professional-grade termite inspections to your property
Renting a thermal camera and running your own scan is a reasonable first step. But when the moisture meter confirms an anomaly, when structural members are involved, or when you simply want a definitive answer before a property transaction, the scan needs to be backed by a licensed professional with calibrated tools and the expertise to interpret what they find.

Bespoke-enviro combines thermal imaging with moisture sensing, acoustic detection, and physical verification in a single integrated inspection, backed by over 30 years of pest management experience. The result is a report that holds up, not a color screenshot with a question mark. For homeowners and property managers who want a clear answer and a documented treatment plan, book a termite inspection with Bespoke-enviro and get the multi-sensor corroboration that a single thermograph cannot provide.
Sources
These sources underpin the claims in this article and are worth reading directly if you want to go deeper.
- Detecting Pests with Thermal Imaging | Flir
- Assessment of technologies and dogs for detecting insect pests in timber and forest products
- Detection and monitoring techniques of termites in buildings: A review
- Detection techniques and monitoring systems for termite activity (PMC article)
- Monitoring Systems for Remote Detection of Termites (USDA Forest Products Laboratory report)
- Sensors 2025 article on termite detection and AI