
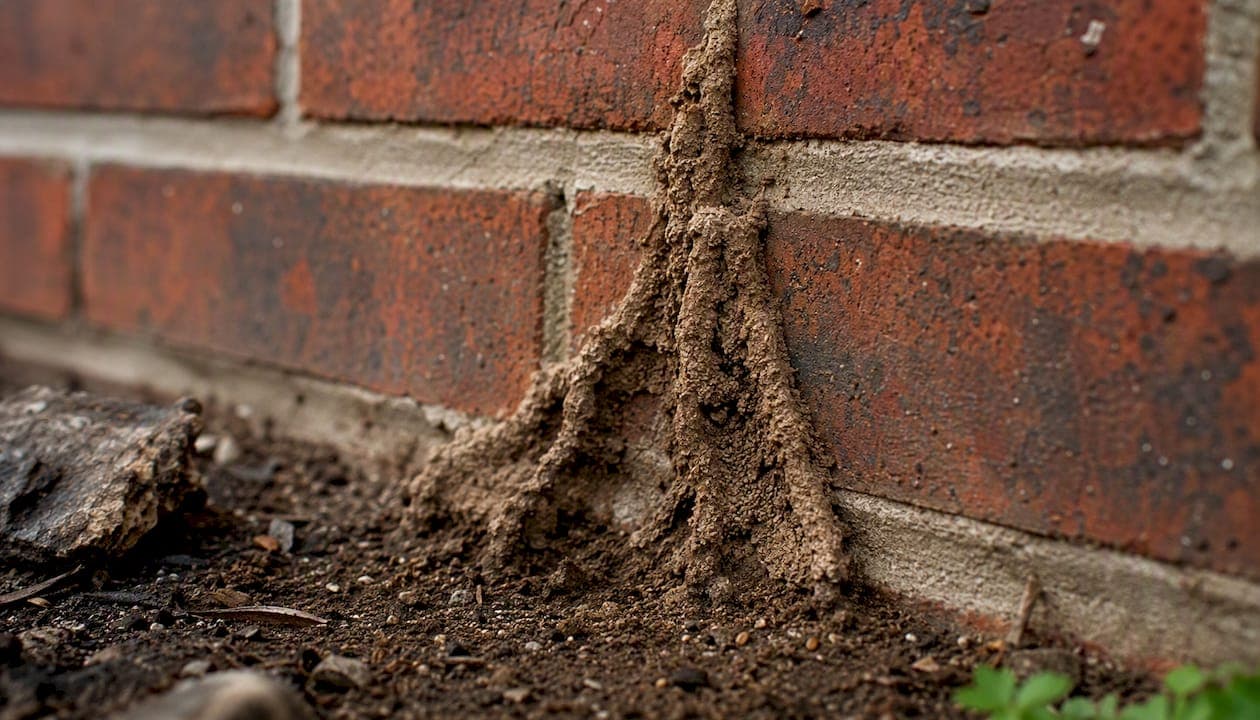
A termite mud tube is an earthen tunnel built by subterranean termites to travel safely between their soil nest and the wood they feed on. Finding one on your foundation wall, slab edge, or interior framing is one of the clearest signs of termite infestation you can spot without professional equipment.
Here is what you need to know right now:
- A mud tube almost always signals subterranean termite foraging activity.
- Absence of tubes does not rule out infestation.
- Your first priority is to document, not disturb.
- A licensed inspection by a qualified pest control professional is warranted whenever you find a tube.
- In Singapore, Bespoke-enviro offers IPM-based termite inspections and treatment using eco-friendly, non-toxic methods.
Key Takeaways
Termite mud tubes almost always signal active subterranean termite foraging, and the right response is to document carefully, avoid major disturbance, and arrange a professional inspection promptly.
| Point | Details |
|---|---|
| Document before you disturb | Photograph every tube with a scale reference and note exact locations before touching anything. |
| Break test has limits | Breaking a small section and rechecking after one to two days indicates activity but does not confirm colony elimination. |
| Absence of tubes is not clearance | Subterranean termites can enter through hidden cracks and voids with no visible tube on the surface. |
| Moisture control is the top prevention lever | Fixing leaks, diverting downspouts, and eliminating wood-soil contact reduce risk more than any single product. |
| Bespoke-enviro provides IPM-based inspections | With 30+ years in Singapore, Bespoke-enviro maps evidence, identifies species, and delivers a written treatment plan using eco-friendly methods. |
Table of Contents
- What termite mud tubes are made of and why termites build them
- How to visually identify mud tubes: types, sizes, and where to look
- How to test safely whether a mud tube is active
- How to tell mud tubes apart from common lookalikes
- What to do right now if you find a mud tube
- Common professional treatments in Singapore and what to expect
- How to prevent mud tubes and fix conditions that invite termites
- When to call a pest professional in Singapore and what to ask
- What to expect from a Bespoke-enviro inspection and IPM-based treatment
- Why early documentation changes inspection outcomes
- Bespoke-enviro: professional termite inspection for Singapore homeowners
- Sources
What termite mud tubes are made of and why termites build them
Termite mud tubes are constructed from a mixture of soil particles, wood fragments, termite saliva, and fecal material. That combination produces a structure that is surprisingly durable when fresh and serves a precise biological purpose: it traps moisture and blocks predators, allowing worker termites to forage above ground without drying out or being exposed to ants and other threats.
Subterranean termites cannot survive in open air for long. Their bodies lose moisture rapidly, so the tube acts as a portable extension of their underground humidity-controlled environment. Without it, foraging above the soil line would be fatal for most workers.
Which termites build shelter tubes?
- Subterranean termites (including the highly destructive Coptotermes species common in Singapore) are the primary tube builders.
- Drywood termites do not build mud tubes. They live entirely within the wood they consume and are detected by frass (pellet-like droppings) rather than earthen tunnels.
- Dampwood termites also do not construct shelter tubes in the same way.
Moisture is the critical driver. Termites need high ambient humidity to survive outside the soil, which is why plumbing leaks, poor drainage, and condensation around building services are such consistent risk factors. That makes year-round vigilance more relevant here than in temperate climates with dry seasons that naturally suppress foraging.
That scale explains why a single visible tube can represent a colony that has already been foraging for months.
How to visually identify mud tubes: types, sizes, and where to look
Knowing what a mud tube looks like and where to find it is the first practical skill for any homeowner. Tubes vary in width from roughly pencil-thin to thicker branching structures. Color ranges from tan to dark brown depending on local soil type. Texture is the most reliable freshness indicator: fresh tubes tend to feel damp and pliable, while old or abandoned tubes crumble when pressed.
The four main tube types
Working tubes are the main highways. They run continuously from soil to a wood food source, are typically the widest, and feel firm and slightly moist. These are the highest-priority tubes to document.
Exploratory tubes are thinner, branch irregularly, and often end abruptly with no wood contact. They represent scouting activity rather than established foraging routes. Finding several of these suggests an active colony searching for new food sources.
Drop tubes hang downward from wood structures (ceiling joists, subfloor framing) toward the ground. They are lighter in color because they contain more wood fiber and less soil. Their presence inside a building usually means the colony has already established a route through the structure.
Swarm tubes (sometimes called castle tubes) are wider, irregular mounds built near the soil surface, often at expansion joints or slab edges. They appear when a colony is preparing to release winged swarmers (alates) and are a strong signal of a mature, established colony.
Tube condition tells you more than tube presence. A damp, pliable tube with intact walls suggests recent activity. A dry, crumbly tube may indicate the colony has moved on — or simply found a new route. Never assume an old-looking tube means the infestation is resolved.
Mud tubes are frequently found along concrete foundations, crawlspace piers, slab edges, plumbing penetrations, and interior joists. In Singapore properties, pay particular attention to:
- Concrete foundation walls and slab edges at ground level
- Expansion joints between concrete sections
- Plumbing and conduit penetrations through slabs or walls
- Timber sill plates and bottom wall plates
- Exterior timber trim and window frames
- Crawlspace piers and subfloor framing
How to test safely whether a mud tube is active
Before you call a professional, one low-risk field test can help you gauge whether the tube is currently in use. Follow these steps carefully.
Step 1: Document first. Photograph every tube you find with a ruler, coin, or pen placed next to it for scale. Record the exact location (which wall, which floor, distance from a fixed reference point). This evidence is valuable to the inspector and, in some cases, to insurers or property buyers.
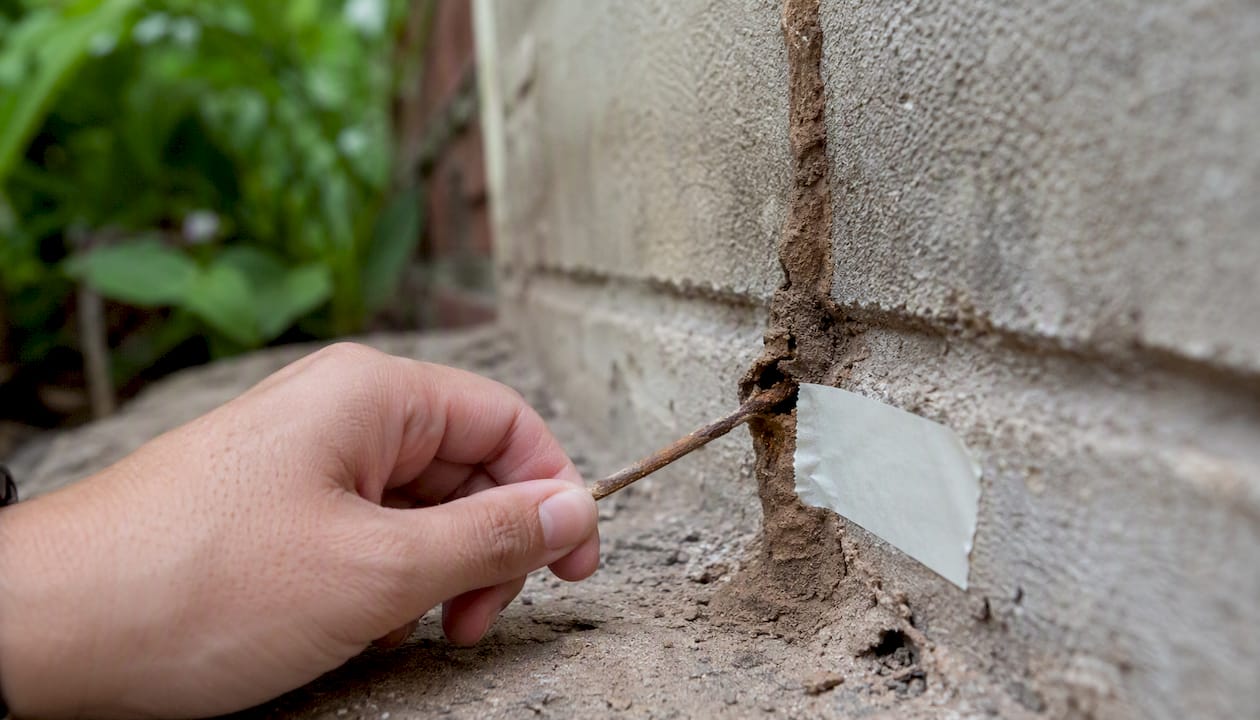
Step 2: Perform one controlled break. Using a pen or small stick, break a 1-inch (2–3cm) section of the tube in one location only. Do not remove or crush the entire tube. Mark the spot with a small piece of tape nearby so you can find it again.
Step 3: Re-check in 24–48 hours. If termites have repaired the break, the colony is active. If the break remains open and dry, the tube may be abandoned — but that does not confirm the colony is gone. Termites may simply be using a different route.
What else to look for nearby:
- Discarded wings near windowsills, door frames, or light fixtures (a sign of recent swarming)
- Frass: small pellets or fine sawdust-like material below infested wood (more typical of drywood termites, but worth noting)
- Hollow-sounding wood when tapped with a screwdriver handle
- Blistered or bubbled paint on wood surfaces
Pro Tip: Never spray household insecticide on or near a mud tube before an inspection. Repellent sprays scatter termites into hidden pathways, making the colony far harder to locate and treat. You will not eliminate the colony, and you will make the inspector's job significantly harder.
Destroying a mud tube does not remove the termite colony. Disturbing tubes may cause termites to shift routes and can make later detection more difficult. The break test is useful for gauging activity, not for treatment.
Virginia Cooperative Extension notes that mud tubes, swarmers, and wood damage are the three most common indicators inspectors rely on — because termites often remain hidden until populations are already large.
How to tell mud tubes apart from common lookalikes
Not every brown streak on your wall is a termite tube. Several common materials and organisms produce markings that homeowners frequently misidentify.
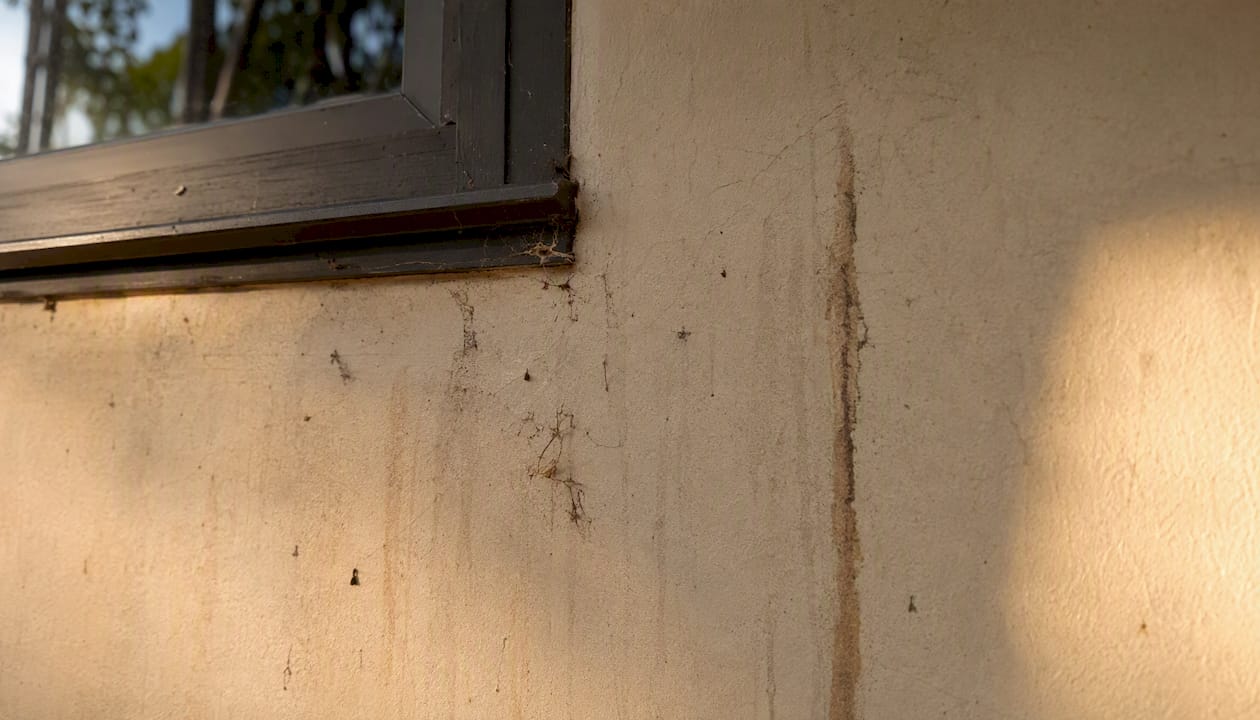
Professional inspectors note that ant trails are one of the most common false positives. The key difference: an ant trail is open and flat on the surface, while a termite tube is a closed, three-dimensional structure you can feel the hollow interior of when pressed.
Other common lookalikes:
- Paint runs or water stains: These are flat, have no structural depth, and do not crumble into soil particles.
- Algae or mold streaks: Green or black, no earthy texture, and wipe off cleanly.
- Root-zone soil lines: Found at ground level only, no vertical travel up a wall.
- Mortar or grout residue: White or gray, crystalline, and located at masonry joints.
Quick confirmation checklist before escalating to a professional:
- Does the marking form a closed tunnel you can feel the walls of?
- Does it contain soil-like particles when broken?
- Does it run vertically from ground level toward wood?
- Is it located near a moisture source (pipe, downspout, wet soil)?
If you answered yes to three or more of those questions, treat it as a probable termite tube and proceed to the steps below.
What to do right now if you find a mud tube
Acting quickly and correctly in the first few hours protects both your property and the quality of the inspection that follows.
Do this immediately:
- Photograph every tube with a scale reference (ruler, coin, or pen).
- Note the exact location on a sketch or in a notes app.
- Mark tube locations with small pieces of painter's tape so they are easy to find again.
- Perform one controlled break test (see Section 4) if you are comfortable doing so.
- Stop using any DIY sprays, foggers, or repellent products near the affected area.
Containment basics:
- Clear clutter from crawlspaces and storage areas near the tubes so an inspector can access them.
- Do not move or discard any infested wood, furniture, or debris until after the inspection.
- Avoid breaking or removing entire tubes — partial disturbance for the activity test is enough.
Singapore-specific checks to note before your call:
- Any plumbing leaks under sinks, behind walls, or at pipe penetrations through slabs
- Drainage issues around the perimeter (pooling water, blocked downspouts)
- Landscaping features close to the building (mulch beds, timber garden edging, potted plants against walls)
- Timber-to-soil contact points (fence posts, deck supports, timber retaining walls)
Pro Tip: Take a short video walkthrough of the affected area before the inspector arrives. A 60-second clip showing tube locations, nearby moisture sources, and any wood damage gives the inspector a useful baseline and can speed up the assessment.
Call a licensed inspector immediately if you observe any of these red flags:
- Multiple tubes on different walls or in different rooms
- Tubes connected directly to structural timber (beams, joists, wall plates)
- Winged swarmers (alates) emerging indoors
- Wood that sounds hollow when tapped along load-bearing members
- Visible wood loss, sagging floors, or doors and windows that no longer close squarely
Common professional treatments in Singapore and what to expect
A licensed pest control provider in Singapore will not simply spray and leave. An IPM-based inspection maps the infestation before any treatment decision is made.
Treatment categories used in Singapore:
- Monitoring and baiting systems: Stations placed in the soil around the perimeter intercept foraging workers, who carry a slow-acting bait back to the colony. This approach targets the colony rather than just the visible tubes and is well-suited to properties where liquid barriers are impractical.
- Liquid soil barriers: A termiticide is applied to the soil around and under the foundation, creating a treated zone that termites cannot cross. Effective for new infestations and as a preventive measure during renovation or construction.
- Localized injection and drilling: Termiticide is injected directly into infested timber or through drilled access points in concrete slabs. Used when infestation is localized and a full perimeter treatment is not warranted.
- Targeted spot treatments: Applied to specific tube locations or entry points identified during inspection. Often combined with baiting for ongoing monitoring.
What an IPM-focused inspection looks like:
- Visual survey of all accessible areas: foundation perimeter, crawlspaces, subfloor framing, roof void if accessible.
- Probing of suspicious wood with a screwdriver or moisture meter.
- Mapping of tube locations, moisture sources, and wood-to-soil contact points.
- Written report with findings, photographic evidence, and a proposed treatment plan.
- Discussion of treatment options, safety precautions, and follow-up schedule.
Practical expectations for homeowners:
- Inspection typically takes 1–2 hours for a standard residential property.
- Treatment access may require moving furniture, clearing storage, or providing access to roof voids.
- Occupants may need to vacate during certain liquid treatments; confirm specifics with your provider.
- Reputable providers offer a written warranty or service contract with scheduled follow-up visits.
Pro Tip: Ask for a written scope of work before signing anything. A quote that lists only "termite treatment" without specifying the method, the treatment zone, and the follow-up schedule is not a complete proposal.
Treatment decisions should be based on species, colony size, and structure type. IPM strategies combine moisture fixes, mechanical barriers, baits, and targeted liquid or injection treatments rather than relying on a single method, as the University of Arizona Cooperative Extension notes.
How to prevent mud tubes and fix conditions that invite termites
Prevention is more cost-effective than treatment. Most of the conditions that attract subterranean termites to a Singapore property are correctable with basic maintenance.
High-priority repairs:
- Eliminate all wood-to-soil contact: raise timber decking, replace timber fence posts with metal, and ensure sill plates are not in direct contact with soil or concrete that stays wet.
- Fix plumbing leaks promptly, including slow drips under sinks and condensation around cold-water pipes.
- Divert downspouts at least 1 meter from the foundation.
- Improve ventilation in crawlspaces to reduce condensation on subfloor framing.
- Remove stacked timber, cardboard, and organic debris stored against exterior walls.
Landscape and drainage adjustments:
- Grade soil away from the foundation so surface water drains outward.
- Replace organic mulch within 300mm of the building perimeter with gravel or inorganic material.
- Keep potted plants and planter boxes away from walls and off timber decking.
- Trim vegetation so it does not create shaded, moist zones against the building exterior.
A useful reference for structuring your inspection and maintenance protocols is the pest control SWOT framework, which helps property owners and managers identify vulnerabilities systematically before they become active infestations.
| Prevention Measure | Cost Level | Frequency | Impact |
|---|---|---|---|
| Fix plumbing leaks | Low | As needed | High |
| Eliminate wood-soil contact | Low–Medium | Once, then annual check | High |
| Divert downspouts | Low | Once | Medium–High |
| Gravel perimeter strip | Medium | Once, annual top-up | Medium |
| Crawlspace ventilation upgrade | Medium | Once | High |
| Professional annual inspection | Medium | Annual | High |
| Baiting system maintenance | Medium | Quarterly | High |
Sample maintenance schedule:
- Monthly: Check under sinks, around pipe penetrations, and at slab edges for moisture or new tube activity.
- Quarterly: Walk the full perimeter, inspect crawlspace access points, and clear any organic debris against walls.
- Annually: Schedule a professional inspection, review any baiting stations, and re-check wood-to-soil contact points after any landscaping changes.
When to call a pest professional in Singapore and what to ask
Some situations call for an immediate professional response rather than a wait-and-see approach.
Call the same day if you observe:
- Multiple tubes on different walls or in separate rooms
- Tubes running directly up or into structural timber
- Winged swarmers emerging indoors, especially near light sources
- Hollow-sounding load-bearing members (beams, columns, wall studs)
- Any visible structural sagging, cracking, or door/window misalignment that appeared recently
Questions to ask on your first call:
- Can you identify the termite species present, and does that affect the treatment approach?
- What does your inspection cover — foundation perimeter, crawlspace, roof void, interior framing?
- Which treatment method do you recommend and why, given the construction type of my property?
- What safety precautions apply during and after treatment for occupants and pets?
- What warranty or service contract do you offer, and what does follow-up monitoring include?
- Will I receive a written report with photos and a mapped treatment plan?
Red flags to watch for in quotes or inspectors:
- A quote with no site visit — any reputable provider inspects before proposing treatment.
- Vague reports with no species identification or mapped tube locations.
- Pressure to immediately replace large sections of structural timber without documented evidence of damage.
- No mention of follow-up monitoring or warranty.
- Refusal to explain the treatment method or provide a material safety data sheet on request.
What to expect from a Bespoke-enviro inspection and IPM-based treatment
Bespoke-enviro has operated in Singapore for over 30 years, building its practice around integrated pest management principles that prioritize non-toxic, eco-friendly methods alongside effective colony control. For termite cases, that means the inspection comes before any treatment recommendation, and the treatment plan is matched to the species, the structure, and the moisture conditions found on site.
What Bespoke-enviro documents during a termite inspection:
- Tube locations mapped to a site plan with photographs
- Moisture readings at high-risk points (plumbing penetrations, crawlspace framing, slab edges)
- Wood probe results for suspected damage areas
- Identified or suspected termite species
- Moisture and landscaping risk factors contributing to the infestation
Typical Singapore service timeline:
- Day 1: On-site inspection and evidence mapping (1–2 hours for a standard residential property)
- Days 1–3: Written risk assessment and treatment proposal delivered
- Days 3–7: Targeted treatment (baiting installation, liquid barrier, localized injection, or a combination)
- Days 30–90: Follow-up monitoring visits to assess colony response and bait uptake
- Ongoing: Warranty period with scheduled inspections as agreed in the service contract
Safety documentation homeowners should request:
- Material Safety Data Sheets (SDS) for any chemical products used
- Written occupant precautions (re-entry intervals, ventilation requirements)
- A copy of the written inspection report for your property records
Why early documentation changes inspection outcomes
The homeowners who get the most from a professional termite inspection are the ones who arrive prepared. A clear set of photographs, a note of which walls the tubes appeared on, and any observations about recent moisture problems or structural changes give an inspector a working hypothesis before they even open their kit. That preparation shortens the inspection, reduces the chance of missing a secondary infestation point, and produces a more targeted treatment plan.
We have seen cases where a homeowner's single photograph of a drop tube on a ceiling joist led directly to the discovery of a Coptotermes colony in the roof void — a location that might not have been prioritized without that visual lead. Documentation is not bureaucratic caution. It is the fastest path to an accurate diagnosis.
The broader point is this: subterranean termites are patient, and their damage accumulates quietly. A mud tube is one of the few moments the colony becomes visible. Treating that visibility as an opportunity to gather evidence, rather than a problem to scrub away, is the decision that leads to better outcomes.
Bespoke-enviro: professional termite inspection for Singapore homeowners

Finding a mud tube is unsettling, but it is also the clearest early warning signal a termite colony will give you. Bespoke-enviro turns that signal into a complete picture. Our inspectors map tube locations, probe suspected wood damage, measure moisture at high-risk points, and deliver a written report with a treatment plan matched to your property's construction type and the species present.
With over 30 years of experience in Singapore and an IPM-first approach, we use eco-friendly, non-toxic treatments that protect your family and pets while addressing the colony at its source. No vague quotes, no unnecessary full-structure recommendations, and no treatment without a documented inspection first.
If you have found a mud tube or any other sign of termite activity, contact Bespoke-enviro to schedule a professional inspection. Bring your photos and location notes — we will take it from there.
Sources
Use these references to deepen your understanding and bring informed questions to your inspection appointment. Where possible, bring printed photos and your location notes to the visit.
- Signs of Termite Infestation | Mississippi State University Extension Service
- Termite mud tubes: How to recognize termite damage, termite mud tubes & what termite tubes mean | Inspectapedia
- Termite Mud Tubes: What They Look Like And What They May Mean | TermiteHQ
- 444-501: Termites of the Southeastern United States | Virginia Cooperative Extension (excerpt)
- Termite mud tubes - Termite Web