
Heat treatment can eliminate the vast majority of bed bugs, including eggs, in a single visit when performed by trained professionals using industrial equipment and proper sensor monitoring. That's the short answer. The longer one involves a few conditions that determine whether you are a good candidate.
Three quick criteria for choosing heat:
- Infestation size and structure: Heat works best for moderate-to-large infestations spread across multiple rooms. A single isolated piece of furniture may be handled more cheaply with a containerized heat chamber or targeted chemical treatment.
- Clutter and belongings: Heavily cluttered spaces create cold spots that block heat penetration. If you can prep and declutter beforehand, heat becomes far more viable.
- Budget and tolerance for visits: A professional whole-home bed bug heat treatment typically costs between $500 and $5,000 depending on square footage and crew. This cost is generally higher upfront than a multi-visit chemical program, but it can resolve the infestation in one day.
Pro Tip: Before booking, ask the company for written documentation of sensor placement in hard-to-heat locations (baseboards, furniture voids, wall junctions) and require a written follow-up inspection within 7 days of treatment. If they can't provide both, look elsewhere.
Key Takeaways
Professional bed bug heat treatment is highly effective when technicians use industrial equipment, deploy sensors at harborage points, and maintain lethal temperatures for the full required hold time.
| Point | Details |
|---|---|
| Thermal death thresholds | Bed bugs and eggs die within 90 minutes at 118°F or immediately at 122°F; whole-room treatments typically target ambient air temperatures of 135–145°F, with treatment durations of 6–8 hours. |
| Sensor documentation is required | Ambient readings alone don't confirm success; require sensor logs from harborage points before paying. |
| Prep determines outcome | Remove aerosols, pets, plants, and heat-sensitive items; declutter walls to eliminate cold spots. |
| Heat has no residual protection | Combine with desiccant dusts and interceptor traps post-treatment to prevent survivors and reintroduction. |
| Bespoke-enviro's approach | Bespoke-enviro applies IPM-grounded pest management with eco-friendly, non-toxic methods for residential and commercial clients. |
Table of Contents
- How does a professional bed bug heat treatment actually work?
- What temperatures actually kill bed bugs, and how long does it take?
- What should you remove, launder, or protect before treatment?
- What types of heat systems do professionals use?
- When does heat treatment fail, and what are the risks?
- How long does treatment take, and what does it cost?
- What should you do after treatment, and how do you prevent reinfestation?
- What safe DIY heat options actually work?
- What does the research actually say about heat treatment?
- When would we recommend heat, and what red flags should you watch for?
- Bespoke-enviro offers professional pest control grounded in IPM
- Sources
How does a professional bed bug heat treatment actually work?
A professional heat treatment is a full-day operation. Here's what the process looks like from start to finish.
Step-by-step technician workflow:
- Pre-treatment inspection: The technician walks the home, identifies infestation zones, and confirms which rooms require treatment. This also determines heater placement and sensor locations.
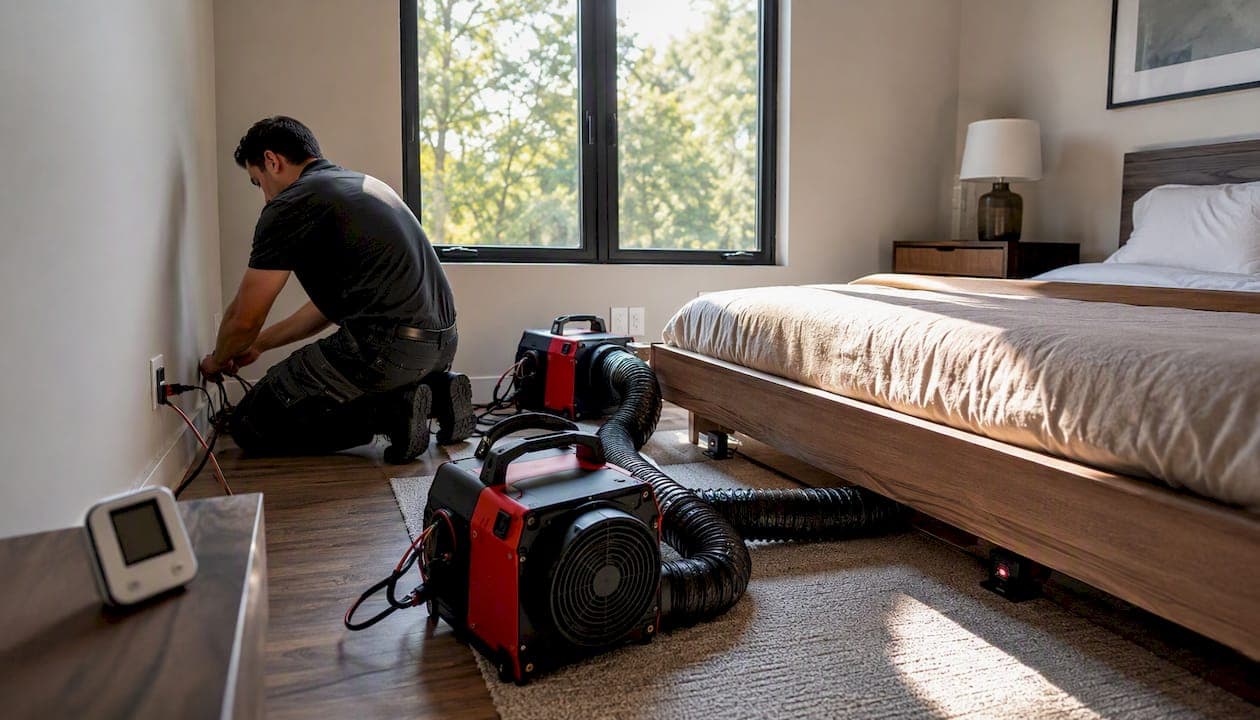
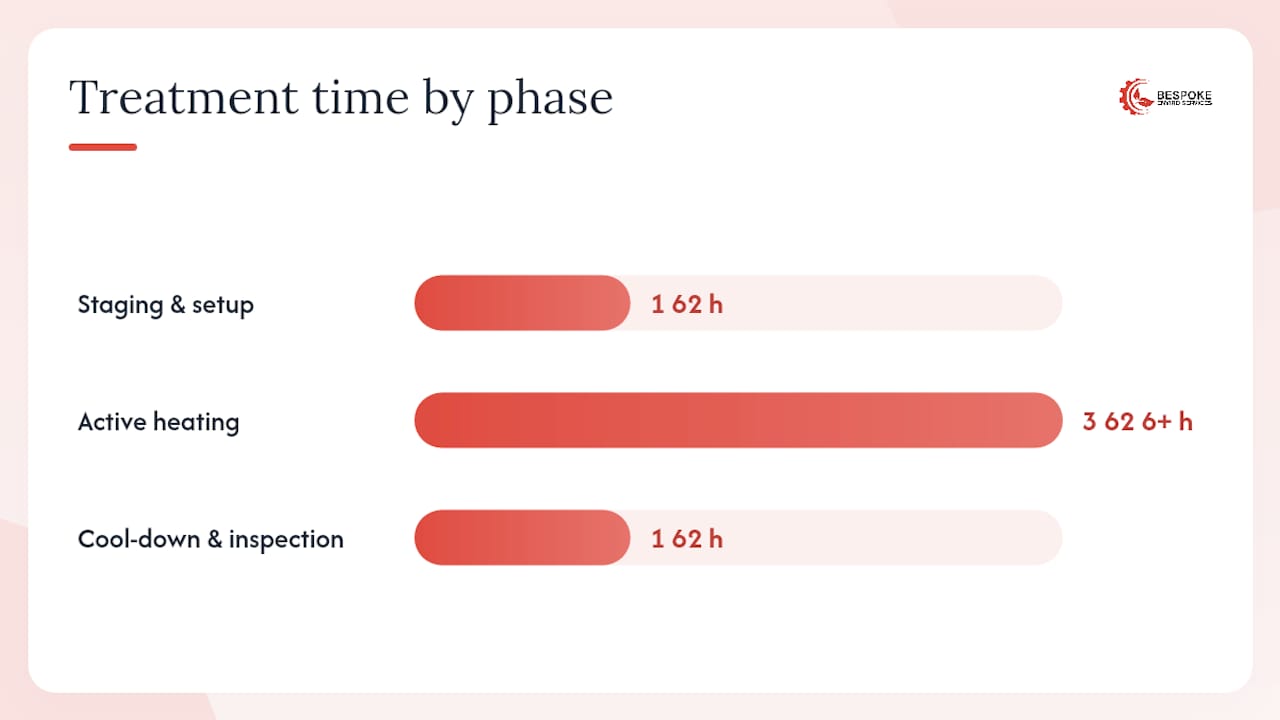
- Staging and equipment setup (1–2 hours): Industrial heaters are positioned throughout the treatment area. For propane-driven systems, the heat source stays outside with ducting running into the home. Electric systems can be staged room by room. Fans are placed to circulate hot air and prevent stratification near ceilings.
- Sensor deployment: Remote temperature sensors go into known harborage points: floor-wall junctions, inside furniture voids, under mattresses, and behind baseboards. These are the locations that matter most, not the ambient air in the center of the room.
- Active heating phase (3–6+ hours): Heaters raise the ambient air temperature to 135–145°F. Technicians monitor sensor readouts continuously and reposition heaters or fans whenever a cold spot appears.
- Hold time: Once all sensors confirm lethal temperatures, the hold time begins. The target is sustained heat at harborage points, not just a momentary spike.
- Cool-down and final inspection (1–2 hours): Heaters are shut off, the space is ventilated, and the technician does a final walkthrough to check for live bugs and confirm sensor logs.
According to Virginia Tech extension, success depends on five factors: the heat system used, building size, active heating time, airflow, and the focused attention of a trained technician who monitors sensors and repositions equipment to eliminate cold spots.
What homeowners should expect during the visit:
- All people and pets must leave the home before heating begins and stay out until the technician clears re-entry.
- Certain items must be removed in advance (see the prep checklist below): aerosols, medications, plants, and heat-sensitive electronics.
- The technician will take frequent temperature readings and may move furniture away from walls to expose harborage zones.
- Expect the full on-site window to run several hours for a whole-home treatment.
Safety steps the technician must take:
- Confirm circuit capacity before running electric heaters to avoid tripping breakers or overloading wiring.
- Remove or protect flammable materials and aerosol cans.
- Protect electronics and heat-sensitive items that couldn't be removed.
- Document sensor readings throughout the treatment for your records.
Pro Tip: Ask the technician to photograph sensor placement at the start of treatment and share the temperature log at the end. That documentation is your proof the job was done correctly, and it's what a reputable company should provide without being asked.
What temperatures actually kill bed bugs, and how long does it take?
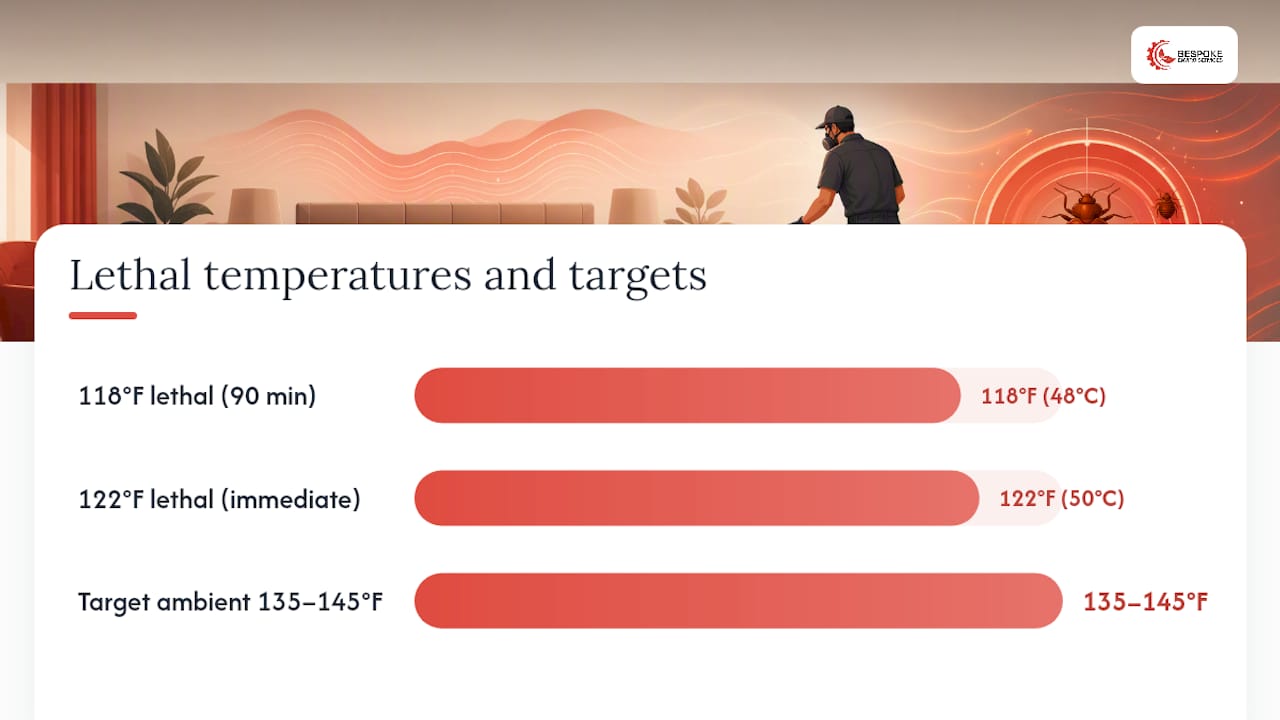
The science here is specific, and the numbers matter. UMN Extension reports that bed bugs and their eggs die within 90 minutes at 118°F (48°C) or immediately at 122°F (50°C). Those are the thermal death points you'll see cited most often.
The catch is that those thresholds apply at the bug's location, not in the middle of the room. A room where the air reads 130°F can still have pockets behind baseboards or inside a mattress seam that never exceed 110°F. That's why technicians target ambient air temperatures of 135–145°F and hold them for the full treatment window: the extra heat margin accounts for the lag between air temperature and harborage temperature.
| Life Stage | Lethal Temperature | Minimum Exposure Time |
|---|---|---|
| Eggs | 118°F (48°C) | 90 minutes |
| Eggs | 122°F (50°C) | Immediate |
| Nymphs | 118°F (48°C) | 90 minutes |
| Adults | 118°F (48°C) | 90 minutes |
| All stages | 122°F (50°C) | Immediate |
Sources: UMN Extension; Virginia Tech PDF
Eggs are the most heat-tolerant life stage. Adults and nymphs die at the same temperature thresholds, but eggs require the full exposure time to confirm mortality. That's why the 90-minute hold at confirmed harborage temperatures is non-negotiable, not a rough guideline.
Key figure: Bed bugs and eggs die within 90 minutes at 118°F or immediately at 122°F. Whole-room treatments target sufficiently high ambient temperatures to help ensure harborage points reach bed bug lethal thresholds. — UMN Extension
The Virginia Tech PDF reinforces this: ambient temperature is not a reliable success metric. Sensors placed inside cracks, crevices, and furniture voids are the only way to confirm that lethal temperatures were actually reached where bugs hide.
Pro Tip: When reviewing a company's post-treatment report, look for sensor readings from at least three distinct harborage locations, not just one ambient reading from the center of the room. A single ambient reading tells you almost nothing about what happened behind the baseboard.
What should you remove, launder, or protect before treatment?
Preparation is where most homeowner mistakes happen. Skipping prep doesn't just risk your belongings; it creates cold spots that let bugs survive. Plan on 24–48 hours of prep work before the technician arrives.
Items to launder before treatment:
- Bed linens, pillowcases, and mattress covers: wash and dry on high heat for at least 30 minutes. Seal in clean plastic bags immediately after.
- Clothing from infested rooms: same process. Bag and seal before returning to the room.
- Stuffed animals and fabric items that can tolerate high heat: dryer on high for 30+ minutes.
Items to remove from the home entirely:
- Pets, fish tanks, and houseplants (heat will kill them).
- Aerosol cans, pressurized containers, and propane cylinders: these can rupture or explode.
- Medications, especially those requiring refrigeration or that are heat-sensitive.
- Candles, wax items, and vinyl records: they will melt.
- Artwork, antiques, and musical instruments with glued joints.
Items that need special handling but can stay:
- Electronics: move away from direct heat sources and confirm with the technician whether they need additional protection. Laptops and tablets should generally be removed.
- Wooden furniture: can stay but should be pulled away from walls to allow airflow.
- Mattresses and box springs: leave in place; these are primary harborage zones and need to be treated.
| Item Category | Action Required |
|---|---|
| Bed linens and clothing | Launder on high heat, bag and seal |
| Aerosols and pressurized cans | Remove from home entirely |
| Medications and heat-sensitive items | Remove from home entirely |
| Candles, wax, vinyl records | Remove from home entirely |
| Pets and plants | Remove from home entirely |
| Laptops and tablets | Remove or confirm protection with technician |
| Mattresses and box springs | Leave in place for treatment |
| Small infested items (books, bags) | Use a heat chamber or bag for treatment |
| Wooden furniture | Pull away from walls, leave in place |
For homeowners with heavy clutter, the prep phase is especially important. Stacked boxes against walls act as insulation, blocking heat from reaching the floor-wall junction where bugs concentrate. Break up stacks, move items to the center of the room, and give the technician clear access to every wall surface.
Consumer heat chambers, like ZappBug-style devices, are useful here. Small items that can't go in the dryer, such as books, bags, and shoes, can be treated in a containerized heater before or after the professional visit. Rutgers Cooperative Extension notes that these devices are commercially available and effective for decontaminating belongings without a full house treatment.
What types of heat systems do professionals use?
Not all heat treatment equipment is the same, and the system a company uses affects both the treatment outcome and the risks to your home.
ThermaPureHeat® is a propane-driven system that generates high BTUs and can heat large, multi-story homes. The heat source stays outside the structure, with ducts running hot air into the treatment area. It's well-suited for whole-home treatments in larger properties, but the ductwork setup adds complexity and requires experienced technicians to manage airflow across multiple rooms. The VDACS fact sheet describes ThermaPureHeat® as one of the commercial systems operating at typical ambient temperatures around 120–135°F, relying on sensors and hold times to confirm lethal temperatures in hard-to-reach spots.
Temp-Air Heat Remediation System® uses electric heating units that can be staged room by room, which makes them more flexible in smaller homes or apartments. Electric systems don't require external propane tanks, which simplifies setup in urban buildings. The tradeoff is BTU output: electric systems may take longer to reach target temperatures in large or poorly insulated spaces. The same VDACS guidance covers Temp-Air as a commercially referenced system for whole-unit treatments.
ZappBug and containerized heat chambers are consumer-grade devices designed for treating luggage, clothing, and small household items. They plug into standard outlets and reach temperatures sufficient to kill all life stages. They are not a substitute for whole-home treatment, but they're genuinely useful for decontaminating belongings before bringing them back into a treated space, or for travelers who suspect they've picked up bugs on the road.
Steam operates differently from the systems above. Near-boiling steam kills bugs on contact at the point of application, making it effective for mattress seams, upholstery, and fabric surfaces. The limitation is penetration: steam doesn't reach inside wall voids or deep furniture joints. Rutgers is clear that steam alone rarely eliminates a full infestation. It's a useful supplement, not a standalone solution.
Property-risk notes by system type:
- Propane systems (ThermaPureHeat®): propane stays outside, but duct connections must be secured. Risk of heat damage to belongings if items weren't properly prepped.
- Electric systems (Temp-Air): lower fire risk, but generator or high-amperage circuit requirements must be confirmed before setup.
- Steam: direct contact with surfaces can cause water damage to wood finishes, electronics, and some fabrics if applied carelessly.
Pro Tip: Ask any company you're considering how many sensors they deploy and whether they can show you live readouts or photos of sensor placement during treatment. A company that can't answer that question clearly is one to avoid.
When does heat treatment fail, and what are the risks?
Heat treatment has a strong track record, but it's not foolproof. Understanding the failure modes helps you ask better questions before you book.
Common failure modes:
- Cold spots behind baseboards and in wall voids: These are the most frequent cause of incomplete treatment. Bugs that retreat into wall cavities during heating can survive if those spaces never reach lethal temperature.
- Cluttered stacks against walls: Boxes, furniture pushed flush against walls, and dense piles of belongings act as thermal insulation. Heat can't penetrate them fast enough to kill bugs hiding underneath.
- Multi-unit building heat exchange: In apartments and condos, adjacent units can act as heat sinks, drawing warmth away from the treatment space and making it harder to sustain target temperatures.
- Insufficient monitoring: A treatment where the technician relies on a single ambient sensor rather than multiple harborage-point sensors is likely to miss cold spots. Virginia Tech extension research identifies technician attention as the single most important variable in treatment success.
- Inadequate hold time: Reaching 130°F for 20 minutes is not the same as holding 118°F at harborage points for 90 minutes. Rushed treatments that hit target temperature briefly and then shut down are a known failure mode.
Property damage risks:
Improperly performed heat treatment can warp wood floors, damage electronics, delaminate furniture with heat-sensitive adhesives, and melt wax-based items. These risks are manageable with proper prep and a competent technician, but they're real.
When to supplement with other methods:
The U.S. EPA recommends integrating non-chemical and chemical methods because heat leaves no residual protection. A home that's been successfully treated can be reinfested the next day if bugs are reintroduced on luggage, used furniture, or a visitor's belongings. Post-treatment desiccant dusts like CimeXa (silica aerogel) or diatomaceous earth applied in wall voids and cracks can catch survivors and slow reintroduction. For homes with structural features that make full heat penetration difficult, a combined approach using heat for the bulk of the infestation and targeted residuals for hard-to-heat zones is often smarter than heat alone.
When to reconsider heat entirely: If the structure has extensive wall voids, multiple HVAC returns that would require sealing, or is part of a multi-unit building where adjacent units can't be treated simultaneously, a chemical IPM program may achieve better coverage at lower risk.
What to require from your technician to reduce failure risk:
- Minimum of one sensor per room, with additional sensors at floor-wall junctions and inside furniture voids.
- Written documentation of sensor readings at multiple time points during treatment.
- Technician repositioning of heaters and fans at least once during the active heating phase.
- A scheduled follow-up inspection within 7 days.
How long does treatment take, and what does it cost?
Typical timeline for a whole-home treatment:
- Site inspection: 30–60 minutes (sometimes done as a separate pre-treatment visit)
- Setup and equipment staging: 1–2 hours
- Active heating and hold time: 3–6+ hours depending on home size and how quickly harborage points reach lethal temperature
- Cool-down and final inspection: 1–2 hours
- Total on-site time: typically 6–8 hours for a whole-home treatment
Single-room treatments run shorter, often 4–5 hours total, but the setup cost is similar since the same equipment and crew are mobilized.
Cost ranges and what drives price:
According to Virginia Tech extension, reported industry costs for whole-home heat treatments run from approximately $500 to $5,000. The wide range reflects real variables:
- Square footage: Larger homes require more heaters, more sensors, and longer hold times.
- Multi-level homes: Heat rises, so upper floors heat faster than lower ones. Multi-story homes require more equipment repositioning and longer active heating phases.
- Equipment and crew: A two-technician crew with 10+ sensors costs more than a solo operator with two sensors, and the difference in outcome quality usually justifies it.
- Complicated HVAC or construction features: Homes with many wall voids, crawl spaces, or unusual construction require more time and equipment to heat thoroughly.
Questions to ask when getting a quote:
- How many sensors do you deploy, and where specifically will they be placed?
- How many technicians will be on-site during the treatment?
- What documentation will I receive after treatment (sensor logs, photos)?
- Does your liability insurance cover property damage during heat treatment?
- What is your re-treatment policy if live bugs are found at the follow-up inspection?
- Is a follow-up inspection included in the price, or is it billed separately?
Budgeting guidance:
A single heat visit makes financial sense when the infestation is widespread across multiple rooms and you want resolution in one day. If the infestation is limited to one room and you have time for a multi-week chemical IPM program, staged chemical treatment may cost less overall. The calculus shifts back toward heat when you factor in the disruption cost of multiple chemical visits and the peace of mind from a non-chemical approach.
What should you do after treatment, and how do you prevent reinfestation?
The treatment itself is only part of the job. What you do in the following weeks determines whether the infestation is truly resolved.
Immediate post-treatment steps:
- Wait for the technician's all-clear before re-entering. The home needs to cool to a safe temperature first.
- Don't vacuum or clean aggressively for at least 24 hours. Any desiccant dust the technician applied needs time to work.
- Inspect mattresses and box springs before putting linens back on. If you see any live bugs, contact the company immediately.
- Install mattress and box spring encasements before remaking beds. These trap any survivors and make future inspections easier.
Monitoring schedule:
- 1 week post-treatment: Full inspection of all treated rooms. Check interceptor traps placed under bed and furniture legs.
- 3 weeks post-treatment: Second inspection. Any live bugs found at this point suggest a cold spot was missed or reintroduction has occurred.
- Monthly for 3 months: Check interceptor traps and monitor for activity. A clean 3-month window is a strong indicator of success.
Interceptor traps (ClimbUp-style devices placed under furniture legs) are inexpensive and give you an early warning system. Active monitors that use CO2 or heat to attract bugs are more sensitive but cost more. For high-risk situations, the combination of both is worth it.
Combining heat with residuals:
Because heat leaves no residual protection, the U.S. EPA recommends integrating it into an IPM plan. Desiccant dusts like CimeXa applied in wall voids, behind outlets, and along baseboards after treatment can catch any survivors that emerge later. This combination is commonly recommended by extension experts and doesn't require chemical sprays in living areas.
Prevention going forward:
- Keep mattress and box spring encasements on permanently.
- Inspect luggage after travel and run clothing through a hot dryer before storing.
- Avoid bringing used furniture or mattresses into the home without inspection.
- Reduce clutter, particularly along walls and under beds, to eliminate harborage zones.
Pro Tip: Interceptor traps cost a few dollars each and take 30 seconds to install. Put them under every bed leg and check them weekly for the first month after treatment. They're the cheapest and most reliable early-warning system available.
What safe DIY heat options actually work?
DIY heat has a narrow but real role in bed bug management. The key is knowing exactly where it works and where it becomes dangerous.
What works:
- Clothes dryer on high heat for 30+ minutes: This is the most reliable DIY heat method available. It reaches temperatures well above the 118°F threshold and is safe for most fabrics, clothing, and linens. Bag items immediately after the cycle to prevent recontamination.
- Consumer heat chambers (ZappBug-style devices): These plug-in enclosures reach lethal temperatures and are effective for luggage, shoes, books, bags, and other items that can't go in a dryer. Rutgers Cooperative Extension confirms that containerized heat chambers are commercially available and effective for decontaminating belongings.
- Steam on fabric surfaces: A high-quality steamer applied slowly to mattress seams, upholstery, and baseboards can kill bugs on contact. Move the steamer slowly enough that the surface stays hot for several seconds. Steam near boiling temperature (around 212°F) kills instantly at the point of contact.
What not to do:
- Space heaters, ovens, or household thermostats to heat a whole room: These cannot uniformly heat wall voids, furniture interiors, or floor-wall junctions to lethal temperatures. The U.S. EPA explicitly warns that DIY whole-house heating attempts with consumer equipment present serious fire and safety hazards and are ineffective at reaching harborage temperatures.
- Leaving a car in the sun: Temperatures inside a parked car can reach high levels on a hot day, but they're inconsistent and rarely sustained long enough at harborage points to guarantee mortality.
Other practical alternatives:
- Freezing small items: Temperatures below 0°F (−18°C) for several days can kill bed bugs in small items. This works for books, electronics, and other heat-sensitive objects. The catch is that most home freezers don't reach cold enough temperatures consistently, and the exposure time required is longer than most people expect.
- Targeted insecticide IPM: For limited infestations, a licensed pest control professional using a combination of contact sprays, desiccant dusts, and monitoring can be highly effective. This is often the right call when the infestation is confined to one piece of furniture or one room.
When the infestation has spread beyond a single room or piece of furniture, DIY methods become inadequate. That's the point to call a professional.
What does the research actually say about heat treatment?
The evidence base for bed bug heat treatment is solid, but it comes with important nuances that extension researchers are careful to state.
What university and EPA guidance agree on:
- The thermal death points (118°F for 90 minutes, 122°F immediately) are well-established and consistent across extension sources including UMN Extension and Virginia Tech.
- Ambient air temperature is not a reliable success metric. Sensors placed at harborage points are required to confirm lethal exposure.
- Heat treatment works best as part of an IPM plan, not as a standalone solution, because it provides no residual protection against reintroduction.
- Technician skill and monitoring intensity are the decisive variables in treatment outcomes.
What the evidence is more limited on:
- Long-term success rates across different building types and infestation sizes are not uniformly documented. Extension guidance is based on controlled conditions and field reports, not large-scale randomized trials.
- The comparative effectiveness of heat versus chemical IPM in multi-unit buildings is an area where guidance is more cautious.
Evidence-based takeaways for homeowners evaluating quotes:
- Require sensor documentation for at least three harborage-point locations, not just ambient air readings.
- Confirm the company's re-treatment policy in writing before signing.
- Ask whether desiccant dust will be applied post-treatment in hard-to-heat voids.
- Check that the technician is licensed and that the company carries liability insurance for property damage.
- Review the EPA's IPM guidance and the Virginia Tech extension page before your consultation so you can evaluate the technician's answers against published standards.
The VDACS non-chemical fact sheet and Rutgers FS1251 are also worth reading before you book. Between them, they cover system types, steam limitations, and the role of containerized heat chambers in a complete treatment plan.
When would we recommend heat, and what red flags should you watch for?
Heat treatment is the right call in specific situations, and the wrong call in others. Here's how Bespoke-enviro thinks about it.
When heat is the strongest option:
- Large infestations spread across multiple rooms where chemical treatment would require many visits over weeks.
- Homeowners who strongly prefer a non-chemical approach, particularly in homes with young children, pets, or occupants with chemical sensitivities.
- Situations where speed matters: heat can resolve a widespread infestation in a single day, while chemical IPM typically requires 2–4 visits over several weeks.
- Infestations in heavily furnished rooms where chemical spray coverage would be difficult to achieve uniformly.
When a combined approach makes more sense:
- Homes with extensive wall voids or construction features that create persistent cold spots.
- Multi-unit buildings where adjacent units can't be treated simultaneously.
- Cases where the infestation is limited to one room or one piece of furniture, making a full heat mobilization disproportionate to the problem.
- Any situation where post-treatment residual protection is a priority, since heat alone provides none.
Questions to ask any technician before booking:
- How many sensors will you deploy, and can you show me where they'll be placed?
- How many technicians will be on-site?
- What written documentation will I receive after treatment?
- Does your company carry liability insurance for heat-related property damage?
- How will you handle my electronics and heat-sensitive belongings?
- What is your re-treatment policy if live bugs are confirmed at follow-up?
Red flags to watch for:
- No sensor data offered or no clear answer about sensor placement.
- A single-technician setup with no monitoring plan.
- A quote significantly lower than the $500–$5,000 range without a clear explanation of scope reduction.
- No written re-treatment guarantee or follow-up inspection included.
- Pressure to book without a pre-treatment inspection.
Bespoke-enviro offers professional pest control grounded in IPM
If you've read this far, you know what separates a heat treatment that works from one that doesn't: sensor density, technician attention, proper prep, and a documented follow-up. Those aren't extras. They're the baseline.

Bespoke-enviro delivers eco-friendly, non-toxic pest management built on integrated pest management principles, with over 30 years of experience across residential, commercial, and industrial properties. For homeowners who want a non-chemical bed bug extermination approach backed by professional monitoring and documented results, Bespoke-enviro's bedbug services combine the rigor this article describes with the accountability that protects your home and your investment. Get in touch with Bespoke-enviro to discuss your situation and get a proper inspection before any treatment begins.
Sources
- Bed Bug Heat Treatments – What you need to know! | VCE Publications | Virginia Tech
- Bed bug prevention and control in the home | UMN Extension
- Controlling Bed Bugs Using Integrated Pest Management (IPM) | US EPA
- Non-Chemical Bed Bug (VDACS fact sheet)
- Non-chemical bed bug control (Rutgers Cooperative Extension) | FS1251
- Bed Bug Heat Treatments – What you need to know! (PDF) | Virginia Tech